


|
StableBit CloudDrive
A secure virtual hard drive, powered by the cloud.
|
Creating a Drive
(Build 1051)

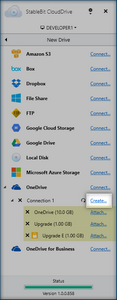
After connecting to a storage provider, you will be able to create new drives that store their data at that provider. To create a new drive, click the Create... link.
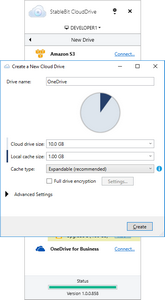
In order to create a new cloud drive, give the drive a name, specify how large you want the drive to be, and how much of that data you want to be cached (i.e. stored locally for faster performance).
 |
You can rename an attached cloud drive at any time by simply renaming it in File Explorer. You can also rename a cloud drive when you attach it. |
|
You can either select an existing size from the drop down box, or type in the exact size that you want. For example, entering 1.21 GB will create a drive that is exactly that size. And you can do the same thing with the cache size as well. |
|
You will be able to resize your cloud drive at any time. You can always increase or decrease the size of the drive within Operating System limits. See Resizing your Drive. |
 |
The absolute maximum allowed cloud drive size in StableBit CloudDrive is 1 petabyte. However, the default file system that StableBit CloudDrive uses is NTFS, and the largest possible NTFS volume is 256 TB. To create drives larger than 256 TB, you will need to use a file system other than NTFS. See File System under Advanced Settings below. |
|
The ability to increase the size of your cloud drive by resizing it later can be limited by the file system. For example, if the initial size of your cloud drive is less than 16 TB, NTFS will format it using 4 KB clusters by default. The maximum volume size for a NTFS volume formatted with 4 KB clusters is 16 TB, and the cluster size cannot be changed without reformatting the volume. To avoid this issue, you can use a file system other than NTFS. See File System under Advanced Settings below. Alternatively, you can explicitly choose a larger cluster size for NTFS, but this may not be optimal. See Cluster Size under Advanced Settings below. |
 |
For more information about how the local cache works and the cache types, see The Local Cache. |
StableBit CloudDrive is able to encrypt the data on your cloud drive with industry standard AES-256 bit encryption, using a password key or a password phrase that only you know.
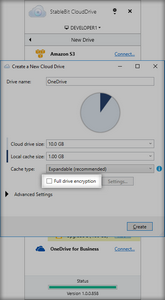
In order to set up full drive encryption on your new cloud drive, check the Full drive encryption check box.
|
For more information about encryption in StableBit CloudDrive, see Encryption. |
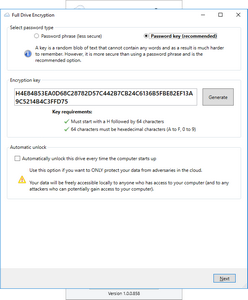
By default, when you choose to encrypt your cloud drive, StableBit CloudDrive will generate a cryptographically secure key for you. This key is the one and only key that can unlock the data on your drive. It is a key that only you know, and no one without the key can access the data on your cloud drive.
|
In order to make sure that the new key is cryptographically secure, it's generated using the cryptographic services provided by the Operating System. For additional security, the key is injected with entropy that is gathered from your mouse movements as you use the application. |
|
The key is a 256-bit cryptographically generated random number. It consists of 32 bytes that are expressed as 64 hexadecimal characters, and it always begins with a "H". You can enter your own key if you'd like, but make sure that is comes from a high quality random number generator that is suitable for use in cryptography. |
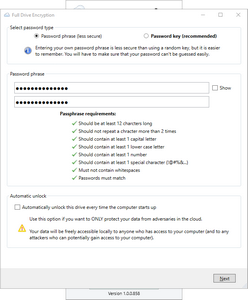
Unlike a password key which is generated for you, a password phrase is a phrase that you make up yourself. It will serve as the one and only password to unlock your cloud drive. A password phrase is easier to remember than a password key, but you have to make sure that you enter a password phrase that is sufficiently long and hard to guess.
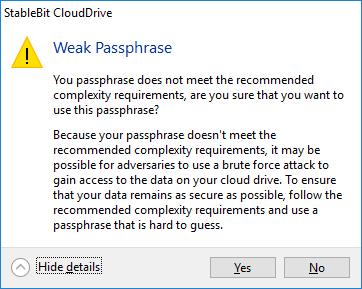
To create a secure key, always follow the password phrase requirements.
 |
You can use a less secure password phrase that doesn't meet the password phrase requirements, but this is not recommended. |
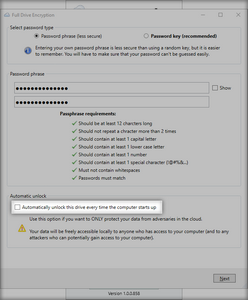
For greater convenience, StableBit CloudDrive can automatically unlock your drive every time that your computer starts up. In order to do this, your password will be saved locally (in an encrypted form) so that you don't have to enter it every time that the cloud drive mounts.
Because your password must be saved locally for this feature to work, it is reasonable to assume that anyone who has access to your computer, or can potentially gain access to your computer (maliciously or otherwise), will be able to access all of the encrypted data on your cloud drive.
|
This is also true even if you are not using the automatic unlock feature and the drive is currently mounted (attached and unlocked). While the drive is unlocked, anyone who has access to your computer can access the contents of that encrypted drive. |
|
You should only use the automatic unlock feature if you only want to protect your data form adversaries in the cloud. If you want to protect your data from adversaries who might gain access to your computer, do not enable automatic unlocking, store your password in a safe place, and make sure to detach your encrypted drive as soon as you're done using it. Once an encrypted drive is detached, no one will be able to access its contents without your password, even if they gain access to your computer. |
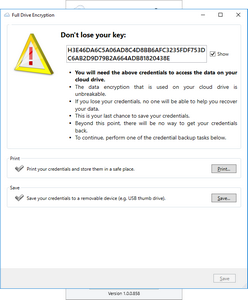
At this point, it's time to make sure that you don't lose your chosen password key or password phrase. This is the last time that you will be able to see your password.
In order to continue, select to either Print... or Save... to backup your password.
Once you either print your password or save it to a file, you will be able to continue with the cloud drive creation.
|
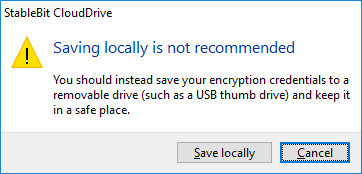
While it is possible to save your password locally, this is not recommended. Ideally, you should save your password to an external drive and keep it in a safe place. |
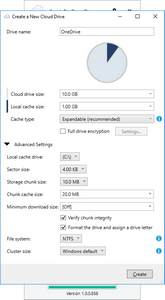
Advanced settings let you configure additional settings for your new cloud drive. Depending on the capabilities of each storage provider, reasonable defaults are chosen for each new cloud drive, and most people shouldn't need to change them.
-
Local Cache Drive
This is the local drive where the local cache for your new cloud drive will be stored.

The location of the cloud drive's cache cannot be changed while the drive remains mounted and attached to the system.
To change the location of the cache, first detach the drive and then reattach it.
Requirements:
-
A simple volume on a basic disk (non-dynamic).
-
A non-removable physical disk (non-virtual).
-
A physical disk that has less than or equal bytes per sector than the cloud drive.
-
A volume that is formatted with NTFS.
-
A volume size that is at least 8 GB.
-
A volume that has at least one access path.
If present, volumes with these names will be selected to be your cache drive by default: "CloudDrive Cache", "Cloud Drive Cache", "Cloud Cache"
Otherwise, a volume that meets all of the above requirements and has the greatest amount of free space is selected by default.
-
-
Sector Size
The number of bytes per sector to emulate on the cloud drive.
When working with your cloud drive, some older legacy applications may not support a 4 KB sector size.
This setting cannot be changed after the drive is created.
-
Storage Chunk Size
Most cloud storage providers don't support uploading parts of files and are only able to upload whole files. In addition, some cloud storage providers don't support downloading parts of files. In order to be compatible with all types of storage providers, StableBit CloudDrive stores its data in chunks. Typically, each chunk is a separate file stored at the cloud storage provider and any updates to your cloud data can only happen in chunk sized increments.
A reasonable default chunk size and the available chunk sizes are chosen based on the capabilities of each storage provider.
Using larger chunk sizes will lead to additional bandwidth overhead when working with the data on your cloud drive.
While at the same time, smaller chunk sizes will add to the amount of work that StableBit CloudDrive and the storage provider will have to do in order to work with the data on your cloud drive.
Many storage providers limit the number of upload and download requests that an application can perform per minute.
If your storage provider imposes such a limit, and if you have a sufficiently fast enough Internet connection, using larger chunk sizes may increase your overall upload and download speed to that provider.
However, changing the chunk size is not the preferred way of speeding up your cloud drive. See I/O Performance > Threads).
This setting cannot be changed after the drive is created.
-
Chunk Cache Size
This is the amount of memory (RAM) to use when assisting chunk-based I/O requests on the cloud drive.
The chunk cache size cannot be smaller than the chunk size, but it can always be turned off completely.
Storage providers that can upload (or write) partial files may not benefit from having the chunk cache enabled, and a reasonable default will be chosen based on the capabilities of the provider.
-
Verify Chunk Integrity
When downloading (or reading) data from the storage provider, data will be verified to make sure that it has not been corrupted, typically by hashing it.
For encrypted drives, data will additionally be verified for authenticity using a HMAC (keyed hash message authentication code) to make sure that it has not been modified with malicious intent.
This setting cannot be changed after the drive is created.
-
Format the Drive and Assign a Drive Letter
When checked, after the cloud drive is created, a single simple volume will be created spanning the size of the entire drive. A file system will then be formatted onto that volume and a drive letter will be assigned (if one is available) to the new cloud drive.
If you need to create a drive that is larger than the maximum volume size for the selected file system (for example, larger than 256 TB for NTFS), then you will need to uncheck this and manually setup the volume from Disk Management after the cloud drive is created.
-
File System
The file system determines how the actual data of your files is organized on the cloud drive.
-
NTFS: This is a common file system that is used in Microsoft Windows and is backwards compatible with all versions of Windows that StableBit CloudDrive runs on. The maximum volume size for NTFS is 256 TB, however, NTFS cloud drives should not exceed 16 TB for optimal performance.
-
ReFS: This is the newer Resilient File System and it's compatible with Windows 8 and newer. It offers greater resiliency over NTFS, but may introduce additional overhead.
If you need to create a cloud drive that is larger than the file system's limit, it's possible to create multiple volumes on the cloud drive and manually format them after the drive is created.
In order to do that, you will need to uncheck Format the Drive and Assign a Drive Letter, and once the drive is created, use Disk Management to manually setup your drive.
-
-
Cluster Size
You can use this setting to force the file system to use a particular cluster size.
The cluster size determines the minimum amount of data that can be read or written to the volume on the cloud drive. For example, saving 1 KB to a volume that is using a 4 KB cluster size will actually take up 4 KB of disk space on the drive. The extra 3 KB of overhead is called slack space.
While you can resize a cloud drive at any time, for NTFS, the cluster size also determines the absolute maximum size of the drive.
Cluster sizes on NTFS:
-
512 B = 2 TB maximum drive size
-
1 KB = 4 TB maximum drive size
-
2 KB = 8 TB maximum drive size
-
4 KB = 16 TB maximum drive size
-
8 KB = 32 TB maximum drive size
-
16 KB = 64 TB maximum drive size
-
32 KB = 128 TB maximum drive size
-
64 KB = 256 TB maximum drive size
By default, NTFS will use the smallest possible cluster size for a given drive size, but not smaller than 4 KB.
In NTFS, cluster sizes larger than 4 KB may trigger inefficient I/O patterns in Windows. Therefore, creating drives larger than 16 TB with NTFS may not be optimal.
ReFS does not limit its maximum size based on the cluster size.
Cluster sizes on ReFS:
-
4 KB (recommended)
-
64 KB
By default, ReFS will use 4 KB clusters.
-